TL;DR:
- A proper finishing workflow is essential for ensuring both the aesthetic quality and structural integrity of carbon fiber components. It involves meticulous surface preparation, optimal environmental conditions, and careful application of UV-stable coatings to achieve durable, defect-free surfaces suitable for outdoor or high-performance use. Skipping steps like adhesion promotion or rushing the process can lead to finish failure, delamination, or compromised part longevity.
A flawed carbon fiber parts finishing workflow doesn’t just hurt aesthetics. It compromises structural integrity, accelerates UV degradation, and produces parts that fail quality inspections before they ever reach a vehicle. Manufacturers and engineers working with carbon fiber face a specific set of challenges: resin degradation from improper surface prep, finish delamination from skipped adhesion steps, and orange peel from poor spray technique. This guide walks through each stage of a professional finishing workflow, from substrate preparation through final polishing, so your team can produce parts that meet both performance and visual standards consistently.
Table of Contents
- Key Takeaways
- Setting up your finishing workflow for carbon fiber parts
- Surface preparation: the foundation of finishing carbon fiber components
- Applying clear coats for UV protection and final aesthetics
- Wet sanding and polishing for a defect-free surface
- Quality assurance and long-term maintenance
- What I’ve learned from getting carbon fiber finishing wrong
- E6carbon’s carbon fiber components, built for the finish you need
- FAQ
Key Takeaways
| Point | Details |
|---|---|
| Prep before coating | Surface contamination and improper sanding are the leading causes of finish failure on carbon fiber components. |
| Layer your protection | A multi-layer system combining UV-stable gel coat and 2K urethane clear coat delivers the most durable outdoor finish. |
| Control your environment | Temperature, humidity, and airborne dust directly affect adhesion quality and final appearance. |
| Match finish to function | Gloss finishes highlight the weave but show scratches; matte finishes offer better practicality on functional aero parts. |
| Verify before it ships | Tactile and visual inspection after cure catches delamination and surface haze before they become field failures. |
Setting up your finishing workflow for carbon fiber parts
Before any coating touches a carbon fiber panel, you need the right tools, materials, and environment locked in. Skipping this setup stage is the most common reason manufacturers get inconsistent results batch to batch.
Tools and abrasives
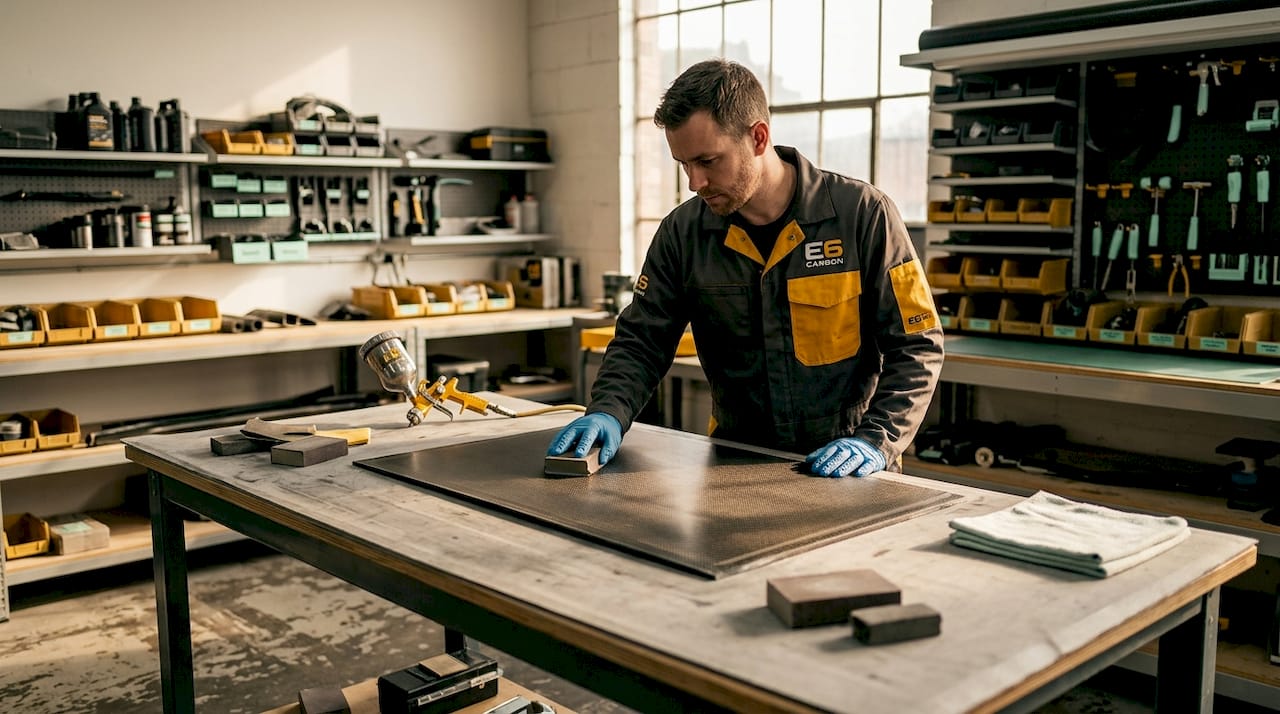
Your sanding toolkit should cover a full grit progression. Start with 320 to 400 grit for initial surface leveling, move to 600 to 800 grit for scuff work before primer or adhesion promoter, and reserve 1500 to 3000 grit for wet sanding after clear coat application. Dual-action orbital sanders work well for large panels, but hand sanding blocks are non-negotiable for curved sections where a power tool will cut unevenly.
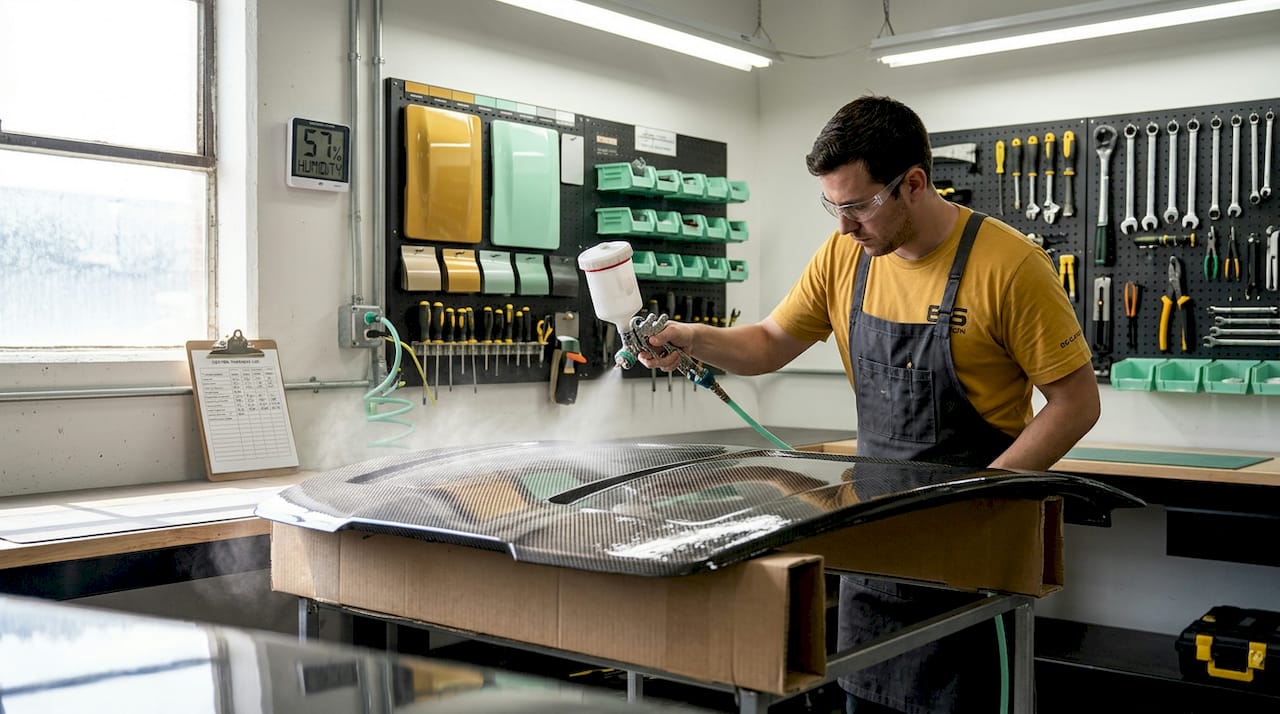
For spray application, a quality HVLP (High Volume Low Pressure) spray gun with a 1.3 to 1.4 mm nozzle is the standard for clear coat work. Smaller nozzles restrict flow on thicker 2K urethane coatings.
Coatings and surface prep chemicals
| Coating Type | Best Use | Key Property |
|---|---|---|
| UV-stable 2K urethane clear | Exterior panels, aero kits | Chemical resistance, long-term gloss retention |
| UV-stabilized gel coat | Molded parts, pre-finish layer | Thickness control, UV absorption |
| Adhesion promoter | Before any coating on bare carbon | Improves mechanical bond to epoxy resin |
| Isopropyl alcohol (IPA) | Final wipe before spray | Removes oils, fingerprints, and residue |
- Adhesion promoters formulated for epoxy substrates are not optional. Bare carbon fiber resin has low surface energy, and standard clear coats will peel without them.
- Tack cloths are required between every coat layer. Dust nibs trapped mid-cure are invisible until the final coat flashes, making corrections extremely costly.
- Keep a dedicated IPA wipe-down step as the last action before you spray. Any skin contact after that point contaminates the surface.
Environmental controls
Temperature should sit between 65°F and 80°F. Humidity above 60% causes moisture to trap under coatings, which leads to blushing and adhesion failure. A filtered, positive-pressure spray booth is ideal. At minimum, use a water trap on your air line and schedule spray sessions to avoid peak humidity periods.
Pro Tip: Run a lint-free tack cloth pass over the part no more than two minutes before spraying. Any longer and ambient dust recontaminates the surface.
Surface preparation: the foundation of finishing carbon fiber components
Surface prep determines whether your finish lasts two years or ten. No coating system compensates for poor preparation underneath it.
Inspect for mold release contamination. New carbon fiber parts often carry residual mold release agents. Clean the entire surface with a dedicated solvent-based release remover before any sanding begins.
Dry sand with 320 to 400 grit to level the resin surface. Use a sanding block and work in a consistent circular pattern. Circular sanding patterns build more uniform micro-roughness and improve clear coat adhesion by 20 to 30% compared to linear passes.
Blow off and IPA wipe. Compressed air clears sanding dust from weave pockets. Follow immediately with an IPA wipe to remove any remaining debris or oil transfer from hands.
Apply adhesion promoter according to manufacturer specs. Flash time varies by product, typically 5 to 15 minutes at 70°F. Do not skip or shorten this step on bare epoxy resin substrates.
Scuff again with 600 grit if adhesion promoter creates any raised texture. Light scuffing levels the surface without removing the adhesion-promoting chemistry. Wipe again with IPA after scuffing.
Mask off any areas of exposed weave you want to preserve. If your design calls for a visible weave section without coating, use fine-line tape to protect those edges. Clean tape edges prevent bleed-through.
Sanding through the resin layer to the raw carbon fibers is a critical failure point. Exposed fibers compromise both finish and structural integrity and require a full epoxy recoat before any further finishing work can proceed.
Pro Tip: Hold a single LED work light at a low angle to the panel surface. This raking light technique reveals low spots, scratches, and contamination that appear invisible under overhead fluorescent lighting.
Applying clear coats for UV protection and final aesthetics
This is where the carbon fiber clear coat workflow either locks in a premium finish or introduces defects that require complete rework. The chemistry matters as much as the technique.
UV-stable clear coats protect carbon fiber resin for 5 to 10 years outdoors, with quality products tested to over 1,000 hours of UV exposure without yellowing. That performance comes from the coating’s internal chemistry. Clear coats combine UV absorbers, stabilizers, and antioxidants specifically to prevent the epoxy resin beneath from breaking down under solar and thermal stress.
A multi-layer system using UV-stable gel coat plus 2K urethane clear is the recommended approach for any part with outdoor exposure. Gel coat thickness targets approximately 0.3 mm as the base protective layer, with the 2K urethane clear coat applied on top for gloss and chemical resistance.
Spray application sequence
Mix 2K urethane per the manufacturer’s ratio. Pot life is typically 30 to 45 minutes after mixing. Work in manageable batches to avoid spraying degraded material.
Set nozzle distance at 6 to 8 inches from the panel surface. Maintaining this distance with full wet coats prevents orange peel and runs simultaneously. Closer application builds too fast and causes runs. Farther application causes dry spray and orange peel.
Apply two to three medium-wet coats with proper flash time between each. Flash time removes solvent without fully curing the coat. Rushing flash time traps solvent, which causes solvent pop and bubbling in subsequent layers.
Tack cloth between every coat. Use a fresh cloth each pass. A used tack cloth deposits as much debris as it collects.
Allow full cure before wet sanding. Most 2K urethane systems require 24 hours at room temperature for sufficient hardness before wet sanding begins. Sanding too early cuts into soft material and creates scratches that show through the finished surface.
Gloss vs. matte finish considerations
High-gloss finishes emphasize the carbon weave pattern dramatically but show every scratch and swirl mark in service. For show car applications and visual aero components like spoilers and hoods, gloss is the standard choice. Matte finishes hide minor scratches better and reduce fingerprint visibility, making them more practical on functional parts handled frequently during installation and inspection. The finish choice should be made at the coating selection stage, not addressed by post-cure sanding.
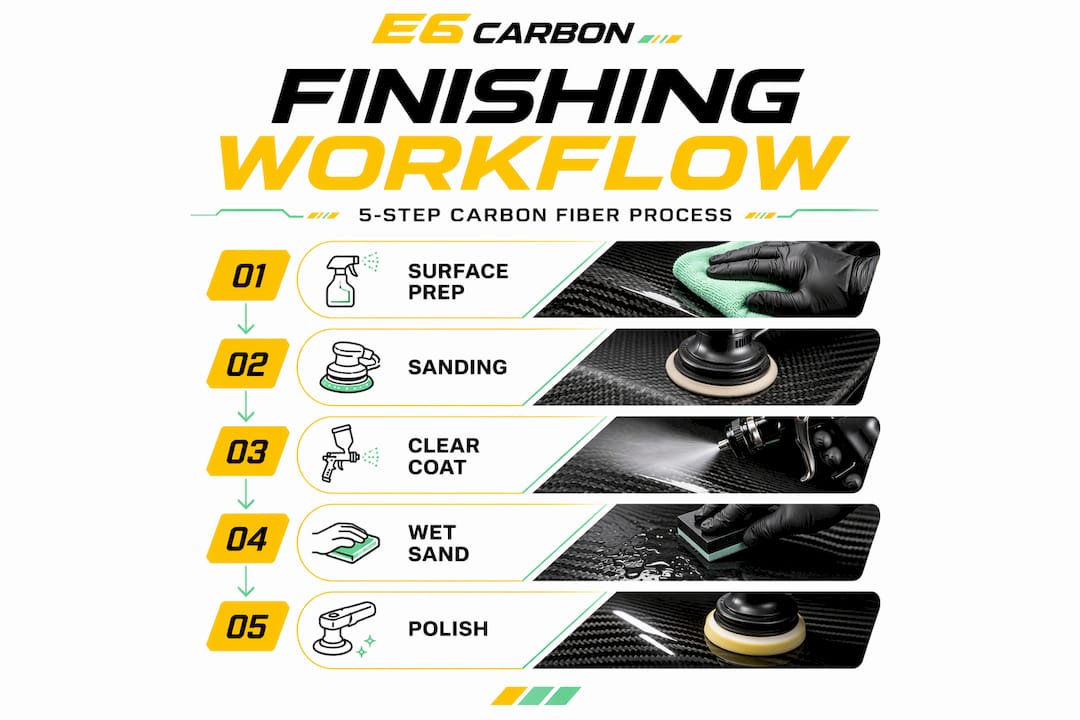
Wet sanding and polishing for a defect-free surface
Wet sanding is the step that separates a professional finish from one that looks good in low light. It removes texture, orange peel, and dust nibs left from the spray stage.
Start with 1500 grit wet sandpaper. Use a dedicated rubber sanding block and keep the surface thoroughly wet with water. Work in straight, overlapping passes. Circular motion at this stage creates cross-hatch patterns that show through later polishing.
Progress to 2000 grit. This removes the scratch pattern left by 1500 grit. Keep consistent, light pressure throughout. Wet sanding requires careful pressure control because hard passes cut through the clear coat, especially on edges and ridges where coating builds thinner.
Final sand at 3000 grit. At this stage, 3000 grit cleans the scratch pattern without removing significant coating thickness. The surface should appear uniformly hazy, with no orange peel visible.
Machine polish with a dual-action polisher and medium-cut compound. This removes the 3000 grit haze and restores clarity. Follow with a fine finishing polish to eliminate any micro-swirls left by the cut compound.
Finish with a panel wipe before final inspection. IPA removes polishing oils that can mask surface defects from inspection lighting.
Pro Tip: After each grit stage, dry the surface completely and check under a focused light source before moving to the next grit. If you can still see scratches from the previous grit, keep sanding. Moving on too early just buries those scratches under finer marks.
Quality assurance and long-term maintenance
A part that passes visual inspection under shop lighting and fails in the field is a workflow problem, not a product defect. Build verification into the process.
- Inspect under multiple light sources. Raking LED light at low angle catches surface texture and adhesion bubbles. Direct overhead light under color-balanced fluorescent tubes reveals yellowing and haze.
- Tactile check for delamination. Run a finger firmly over the surface, particularly around edges and mounting points. Any flex, lift, or hollow sound when tapped indicates adhesion failure under the coating.
- Check for UV yellowing risk. Parts that will see direct sun exposure need UV-stable coatings confirmed by the coating supplier’s spec sheet. Thermoplastic carbon composites with anti-UV additives retain over 90% tensile strength after 2,000 to 3,000 hours of QUV-B testing, giving you a benchmark for evaluating coating and substrate performance together.
| Defect | Likely Cause | Correction |
|---|---|---|
| Orange peel | Nozzle too far, material too dry | Wet sand 1500 to 3000, re-clear if needed |
| Runs or sags | Too much material per coat, nozzle too close | Sand level, re-apply coat |
| Delamination | Adhesion promoter skipped, surface contamination | Strip, re-prep, recoat from bare substrate |
| Surface haze | Polishing oils not removed, moisture trapped | Re-polish, panel wipe with IPA |
| Yellowing | UV-unstable clear coat or resin exposure | Strip and recoat with UV-stable system |
For long-term maintenance, recommend to end users a pH-neutral car wash product and a UV-protective sealant applied every six months on exterior parts. Direct solvent contact will attack even well-cured 2K urethane, so advise against aggressive cleaners near carbon fiber aero components.
What I’ve learned from getting carbon fiber finishing wrong
I’ve seen manufacturers invest heavily in premium carbon fiber parts and then lose most of that value in the finishing stage. The most consistent mistake is treating surface prep as a time cost rather than a quality investment. Teams that rush through sanding and skip adhesion promoter steps always end up spending more time on rework than the shortcut ever saved.
The other thing I’ve found that most guides skip over is the environment. You can have perfect technique and still get inconsistent results if your spray area has temperature swings of 20°F or humidity creeping above 60%. The coating chemistry doesn’t forgive environmental variation the way paint does. 2K urethane is particularly sensitive to moisture during cure.
From a materials standpoint, the choice between gloss and matte is often made on aesthetics alone, when it should also factor in the part’s service environment. A carbon fiber aero kit on a track car takes debris impacts and thermal cycles that a show car wing never sees. Matte finishes on functional aero parts are not just a style preference. They are a maintenance decision that holds up better over a full season.
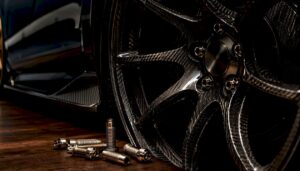
The finishing workflow also directly affects how parts integrate with other performance components. Surface quality on carbon panels affects sealing, fitment, and the precision of gaps around performance wheel finishes and body line matching. Every step in the workflow compounds.
— Kunal
E6carbon’s carbon fiber components, built for the finish you need

At E6carbon, every carbon fiber component is manufactured with finishing quality built into the production process, not added as an afterthought. Whether you’re sourcing parts that arrive ready for final clear coat application or looking for fully finished aero components, E6carbon’s catalog covers both. The AeroTech Carbon Fiber Hood for the Lexus LC500 and the Carbon-Elite Wing for the Lexus LC500 are built to the surface preparation standards this guide describes, giving your finishing team a substrate that’s ready to work with from the moment it arrives. Explore the full carbon fiber lineup at E6carbon for components that match your workflow, not fight it.
FAQ
What is the best clear coat for carbon fiber outdoor parts?
A UV-stable 2K urethane clear coat applied over a UV-stable gel coat base layer offers the strongest protection for outdoor carbon fiber parts, with quality systems lasting 5 to 10 years without yellowing.
How do you prevent orange peel when clear coating carbon fiber?
Maintain a nozzle distance of 6 to 8 inches, apply medium-wet coats rather than heavy single coats, and observe proper flash times between each layer to prevent orange peel formation.
Can you wet sand carbon fiber directly without a clear coat?
Wet sanding bare carbon fiber resin risks cutting through to the raw fibers, which compromises structural integrity. Always apply and fully cure at least one clear coat layer before wet sanding begins.
How do you fix delamination in a carbon fiber finish?
Delamination caused by skipped adhesion promoter or surface contamination requires stripping back to bare substrate, re-cleaning, re-applying adhesion promoter, and recoating from scratch. No topcoat repair holds long-term over a delaminated base.
What is the difference between gloss and matte carbon fiber finishes for aero parts?
Gloss finishes emphasize the weave pattern but show scratches more readily, while matte finishes hide surface wear better and require less maintenance on functional parts that see regular handling and track use.