TL;DR:
- Proper performance wheel alignment requires precise measurement and adjustment of camber, caster, and toe angles to optimize handling and tire life. Thorough inspection of suspension components and understanding unique vehicle setups are crucial for stable, long-lasting results. A final test drive verifies that the car tracks straight, steering centers, and handling meets performance goals.
Misalignment is one of the most expensive problems you can ignore on a performance car. A few tenths of a degree off on camber or toe, and you’re scrapping a set of track tires long before their time, fighting steering that wanders at speed, and leaving cornering grip on the table. The performance wheel alignment steps covered in this guide go well beyond the generic “get it checked at a shop” advice. You’ll get the exact sequence, the measurements that matter, and the decision points that separate a tuner’s setup from a standard road car alignment.
Table of Contents
- Preparation: tools, inspection, and measuring equipment
- Step-by-step adjustment of camber, caster, and toe angles
- Verification: test driving and symptom assessment
- Common mistakes and advanced tips for performance wheel alignment
- Why one-size-fits-all alignment settings don’t work for high-performance cars
- Explore expert wheel solutions and alignment resources at E6 Carbon
- Frequently asked questions
Key Takeaways
| Point | Details |
|---|---|
| Alignment angles matter | Camber, caster, and toe adjustments directly affect tire wear and vehicle handling. |
| Inspect suspension first | Worn suspension parts prevent stable alignment and must be repaired before adjustment. |
| Use proper tools | Accurate measurement depends on good equipment and correct referencing methods. |
| Customize alignment | The best angle settings depend on your car’s modifications and intended use. |
| Verify with test drive | Confirm alignment success by checking steering centering and vehicle tracking on the road. |
Preparation: tools, inspection, and measuring equipment
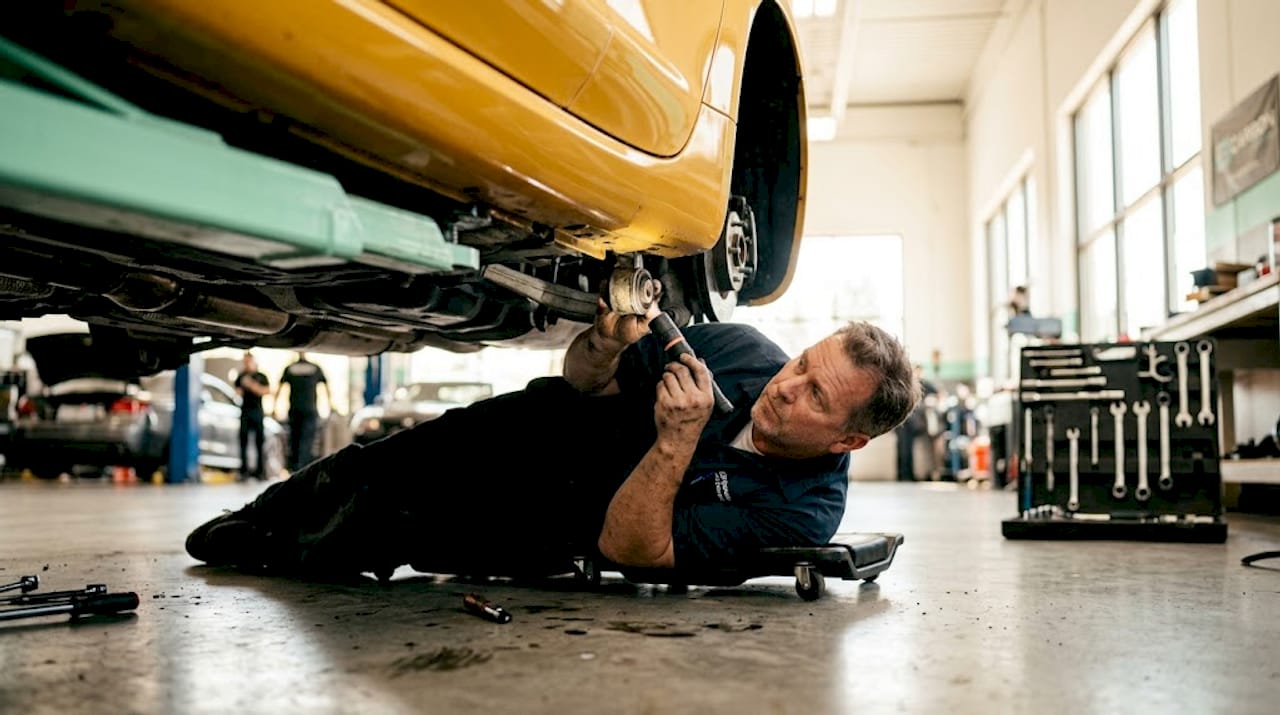
Before you touch a single adjustment bolt, you need two things in order: the right tools and healthy suspension. Skipping either is how you end up chasing ghost readings and wondering why the car still pulls after you just spent three hours on it.
Tools you’ll need
Here’s the minimum equipment for a proper performance alignment setup:
- Flat, level surface (a quality alignment rack or a known-level shop floor)
- Tape measure and precision ruler
- Plumb line or digital camber gauge
- Toe plates or a toe bar with a calibrated scale
- Combination spanners and socket set (metric and imperial where applicable)
- Torque wrench
- Steering wheel centering tool or centering lock
- Alignment turn plates under front wheels
| Tool | Purpose | DIY alternative |
|---|---|---|
| Digital camber gauge | Measures camber angle | Angle finder + plumb line |
| Toe plates | Front and rear toe measurement | Tape measure method |
| Turn plates | Allows wheel movement during caster measurement | Smooth sheet metal on flat surface |
| Torque wrench | Correct tightening of lock nuts | Not recommended to skip |
| Steering center lock | Holds wheel straight during measurement | Tie-down strap through wheel |
Pro Tip: Confirm your surface is level before measuring anything. A floor that drops two millimeters across a wheel base will throw your camber reading enough to matter on a car with aggressive negative camber settings.
Suspension inspection checklist
This step is non-negotiable. Worn components lead to unstable alignment that won’t hold, regardless of how carefully you adjust. Check every ball joint for play, inspect bushings for cracking or deformation, verify tie rod end tightness, and confirm all suspension fasteners are torqued to spec. Check tire pressure too, since a soft tire changes effective wheel height and skews your measurements.
It’s also worth understanding how your wheels affect suspension performance before diving into adjustments. Wheel offset and width change the scrub radius, which changes how alignment angles translate to actual tire contact behavior. On forged monoblock and multi-piece wheels, forged wheel tolerances matter here as well. A wheel with dimensional inconsistencies will introduce variation that even a perfect alignment setup can’t correct.
Finally, center the steering rack. Physically count the turns lock to lock, divide by two, and park the wheel at that midpoint. Lock it in place before you measure anything.
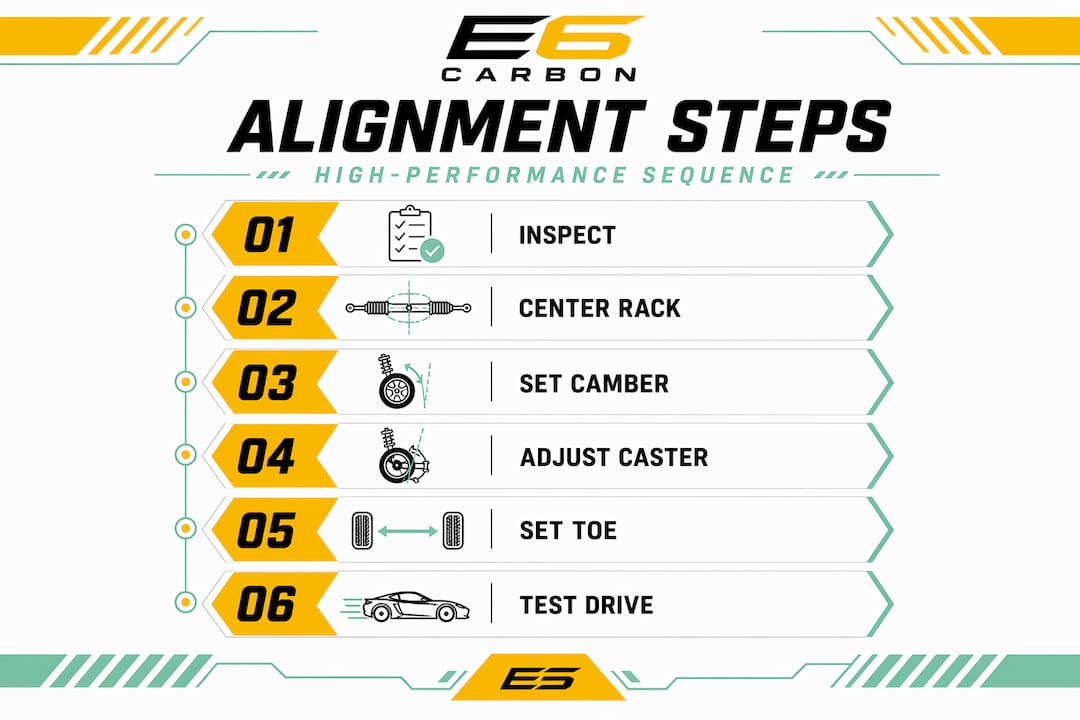
Step-by-step adjustment of camber, caster, and toe angles
Once measurements are taken, the next critical phase is carefully adjusting each angle to match your performance goals. Technicians check and correct camber, caster, and toe in sequence because each affects the others. Do them in the wrong order and you’ll be going back to redo work.
Adjusting camber
- Place your camber gauge or digital angle finder flat against the wheel face, making sure the wheel is pointing dead straight ahead.
- Read the angle. Negative camber (top of wheel tilted inward) is standard for performance applications. Street performance typically runs between -0.5° and -1.5°. Dedicated track setups often go to -2.5° or beyond, depending on the tire and suspension geometry.
- Adjust using eccentric bolts on the strut, camber bolts at the top mount, or shim plates at the control arm, depending on your platform.
- Re-measure after every adjustment. Even a quarter turn on an eccentric bolt can shift camber more than expected.
- Tighten lock nuts to spec once you’ve confirmed the reading.
Adjusting caster
Caster is the forward or rearward tilt of the steering axis. More positive caster increases straight-line stability and improves steering return-to-center feel. You measure it by locking the rear axle, then sweeping the front wheels through a specific angle (typically 10 to 20 degrees each side) while reading the change in camber. The difference gives you the caster angle.
Caster adjustment is less common on production cars because many platforms don’t offer it from the factory. Aftermarket upper control arms or strut mounts open this up. Performance street builds typically target 5° to 7° positive caster. Track cars with high-speed stability demands often run 7° or more.
Adjusting toe
Toe is the angle of the wheel relative to the car’s centerline as viewed from above. Toe-in means the fronts of the tires point slightly toward each other. Toe-out means the opposite.
The DIY toe measurement method involves measuring the distance between the inner edges of both tires at the front and rear of the wheel, then comparing those figures. Adjustment happens at the tie rods: lengthen or shorten the rod to change toe on that corner. Always adjust both sides equally unless you’re correcting a specific tracking issue.
- Front toe for street performance: 0 to 1/16 inch total toe-in
- Front toe for track: slight toe-out (0 to 1/16 inch) for sharper turn-in
- Rear toe: typically 1/16 to 1/8 inch toe-in for stability
Pro Tip: Always re-check your reference link to your wheel fitment guide before finalizing toe settings. Wider wheels change the effective track width, which alters how toe angles translate to actual contact patch behavior at speed.
Lock every adjustment before moving on. A loose tie rod lock nut will give you different readings the moment you take the car off the rack.
Verification: test driving and symptom assessment
After completing adjustments, verifying alignment through testing and symptom assessment ensures your setup performs as intended. Numbers on a gauge mean nothing if the car doesn’t behave correctly under real driving conditions.
What to check before the test drive
- Steering wheel is centered visually with wheels pointing straight
- All lock nuts and adjustment fasteners are torqued
- Tire pressures are set to your target spec, not just inflated randomly
- No binding or unusual resistance when turning the steering wheel by hand
On the road
Find a flat, straight road with no significant crown. Drive at moderate speed and release the steering wheel briefly. The car should track straight without pulling in either direction. Test driving confirms that steering centers correctly and the car tracks without pull or vibration. If it pulls, you likely have a toe imbalance or one-sided camber difference. If it vibrates, check for balance issues first before assuming alignment.
After a moderate-speed corner, let the steering wheel return on its own. Good caster will bring it back to center smoothly. Sluggish return often means insufficient positive caster or binding in the steering column.
Contact geometry critically impacts tire wear and handling stability. A car that tracks straight under neutral conditions but eats tires on one edge is still misaligned, even if the driver hasn’t noticed the pull.
Watch for these symptoms that indicate follow-up adjustments are needed:
- Uneven tire wear across the tread width (camber issue)
- Feathering or sawtooth wear pattern on tire edges (toe issue)
- Vehicle pulling to one side under braking (asymmetric alignment)
- Vibration at highway speeds (may indicate alignment combined with balance problem)
Pro Tip: Checking your performance wheel upgrades alongside alignment work pays dividends. New wheels with different offsets change your effective alignment angles, meaning a setup dialed in on stock wheels may need rechecking after upgrading. Many owners who go through the custom wheels buying process find their previous alignment no longer fits the new wheel geometry.
Common mistakes and advanced tips for performance wheel alignment
Understanding common errors and expert tips helps you achieve stable, repeatable alignment results for your performance build. Most alignment problems that return within weeks trace back to one of the following mistakes.
Adjusting over worn parts. Suspension components with play will not hold alignment regardless of how accurately you set the angles. A worn ball joint with even 0.5mm of movement creates more variation than a full degree of intentional adjustment. Inspect first, align second.
Letting measuring tools slip. On wider, lower-profile performance tires, measuring tools and setups must minimize slip for accurate readings. Magnetic camber gauges on carbon fiber wheel faces won’t stick. Use clamp-on adapters or hub-mounted measuring arms instead.
Single-pass measurements. Take every reading at least three times and average the results. Suspension settles, tools shift, and a single measurement is simply not reliable enough for a performance build where a quarter degree matters.
Over-tightening adjustment hardware. Snapping an eccentric bolt or stripping a tie rod jam nut is an avoidable disaster. Use a torque wrench, not muscle memory.
Applying one alignment to every use case. A setup optimized for Sunday track days will destroy tires on daily commutes. A street comfort alignment will leave cornering performance unused on a circuit. Know your primary use case before you set your targets.
Advanced tips worth noting:
- On independent rear suspension platforms, set rear toe and camber before touching the front axle
- Use chalk marks on the floor to track where your measuring tools were placed for repeat measurements
- Revisit forged wheel tolerances if you’re seeing inconsistent readings corner to corner; wheel dimensional variance is a real source of apparent alignment scatter
- Document your final settings so you have a baseline after future suspension work
Why one-size-fits-all alignment settings don’t work for high-performance cars
Here’s something most alignment guides won’t tell you: the spec sheet that came with your car was written for liability management, not performance. Factory alignment targets are engineered to minimize tire wear complaints across a broad customer base, handle road imperfections without drama, and keep the car feeling stable to an average driver. That has almost nothing to do with what you actually need.
Performance alignment depends on tires, suspension upgrades, ride height, and intended use meaning no universal best setup exists. A lowered BMW M3 on 305-wide rear tires running a coilover kit needs a completely different camber curve than the same car on stock suspension. The factory spec doesn’t know what compound your tires use, how stiff your suspension is, or whether your wheels sit flush or poke. It can’t.
The practical implication: stop chasing generic “performance alignment specs” you found in a forum post for a car that might not even share your suspension components. Instead, work backward from your tire. Wider tires with stiffer sidewalls tolerate more negative camber before you’re running purely on the outer edge. Softer compounds need less camber because they deform into good contact without geometry forcing them there. Ride height changes your camber curve dynamically, meaning your static settings are just the starting point.
Track setups and street setups genuinely diverge. A track car can run -2° or more of rear camber with front toe-out for aggressive turn-in because you’re optimizing for sustained cornering grip, not tire longevity. A street car with those settings will wear tires in 8,000 miles and understeer badly in wet conditions when tire temps are cold.
Understanding how wheels shape suspension performance and handling is part of this conversation. Wheel weight affects unsprung mass, which changes how quickly your suspension responds to inputs. Wheel offset alters the scrub radius and steering feel. None of this is captured in a factory alignment spec from five years ago.
The real skill in performance alignment isn’t measuring. It’s knowing what you’re trying to achieve before you start.
Explore expert wheel solutions and alignment resources at E6 Carbon
To complement your alignment expertise, E6 Carbon offers premium wheels and resources designed to match your performance goals.

When your alignment is dialed in, the next variable is the wheel itself. A precisely aligned car running wheels that don’t match its geometry or load requirements leaves performance on the table. E6 Carbon’s resources cover the full picture: from the forged wheel installation guide that walks you through mounting without compromising your setup, to the performance wheels selection guide that helps you match wheel spec to your build. And once your wheels are on, the forged wheel safety inspection guide keeps you confident your hardware is performing as it should, every session.
Frequently asked questions
What are the three main angles adjusted in a performance wheel alignment?
Camber, caster, and toe are the key angles adjusted to ensure proper tire contact and handling performance. Technicians check and correct all three during a proper alignment session.
Can I perform a performance wheel alignment at home?
Basic toe adjustments can be done at home with proper tools and careful measurement, but accurate camber and caster settings usually require specialized equipment. DIY toe measurement involves tape and tie rod adjustment, while camber and caster require professional-grade tools for repeatable accuracy.
Why is it important to inspect suspension components before alignment?
Worn or loose suspension parts cause unstable alignment that cannot hold proper angles, leading to premature tire wear and poor handling. Suspension health must be verified before alignment to ensure stable, lasting adjustment.
How often should performance alignment be checked?
Performance vehicles should have alignments checked every 12 to 18 months or after any suspension changes. Street-driven cars align every 12 to 18 months, while track vehicles need more frequent inspections due to harder loading cycles.
What does a proper test drive verification entail after alignment?
It involves ensuring the steering returns to center after turns, the car tracks straight without pulling, and no vibrations or steering looseness occur. Test driving confirms centered steering and straight tracking after the alignment process is complete.